The modulation wheel is one of the most expressive tools on synths and MIDI controllers. Traditionally, it controls vibrato amount or filter frequency, but there are many creative uses beyond that. You can use it to add interest and complexity to lead playing, MIDI programming, and automation.
In this guide, we explore techniques like creative gating, Octaver, stuttering, sustain looping, shimmering textures, Pentatonic Harmonizing and more!
Even if you don’t have a Mod Wheel you can do this with any knob/fader or even with just Automation/Modulation editing.
Setup - Synth Modulation source
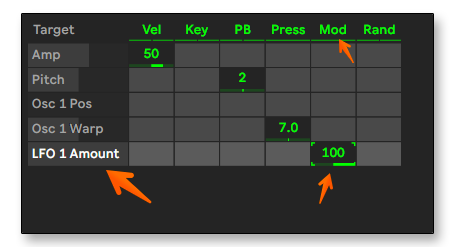
Almost any synth will let us use the Mod Wheel as a modulation source.
For example, in Wavetable we can go to the MIDI Tab and see that by default the Mod wheel is controlling the OSC 1 Wavetable position.
One of the most classic uses of the Mod Wheel is to map it to control the amount of the LFO modulation while the LFO is modulating the pitch which will give us a classic vibrato effect.
Setup - MIDI Mapping

For easy mapping simply use Live’s MIDI Mapping mode, click on the parameter you want to map and move the expression control. You can also adjust the Minimum and Maximum values in the MIDI mapping list.
Setup - EXPRESSION CONTROL
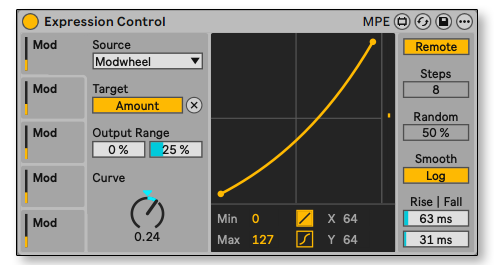
For more advanced control, use the Expression Control. This lets you map the Mod Wheel differently on each track so every track has its own modulation behavior.
It also allows the Modulate mapping mode, which controls the parameter relative to its position.
EDITING Recorded Modulation

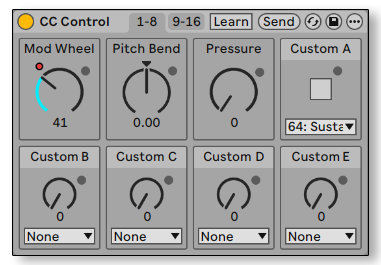
To record and edit the Mod Wheel automation we need to access the Clip Envelopes
Bonus Tip: If you would like to edit the Mod Wheel in a regular automation lane you can use the CC Control MIDI Effect and map the Mod Wheel Macro to your Mod Wheel.
Vibrato
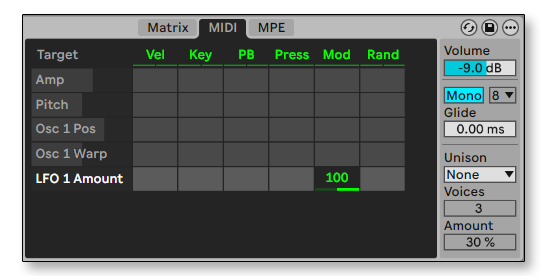

The most classic example of Mod Wheel use is controlling Vibrato amount.
We can achieve this by using a synth/sampler mod system and mapping the Mod Wheel to the amount of pitch LFO.
Some synths have a built-in dedicated vibrato LFO like Ableton’s Analog.
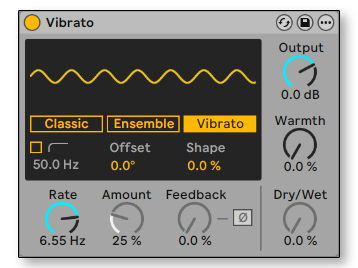
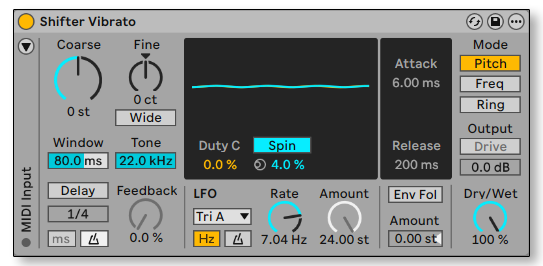
You can also add vibrato using the Chorus-Ensemble Vibrato mode or the built-in LFO in the Shifter Audio Effect. In Shifter, the Triangle Analog waveform adds character and non-linearity to the vibrato.
Adding a slight Spin can widen the effect and create a more interesting stereo vibrato.
Tremolo/Trance Gate
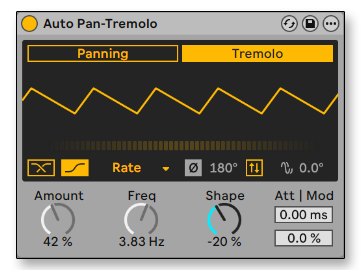
We can also modulate the volume using the Tremolo mode in the Auto-Pan effect.
The most important control to map is the Amount but we can also map the timing parameter for speeding up or slowing down tremolo as we raise the Mod wheel.
While the Amount control range should be 0%-100% we should keep the Rate control a bit more ranged something like 45%-75% to not slow down or speed up the tremolo too much.
We can keep the Rate free (Freq) or change it to synced (Note Division).
For more color and more diffused sound , turn on the Vintage Tremolo Mode.
Finally, we can turn the Shape control all the way down for a more plucky sound.
Pentatonic Harmonization - Auto Shift
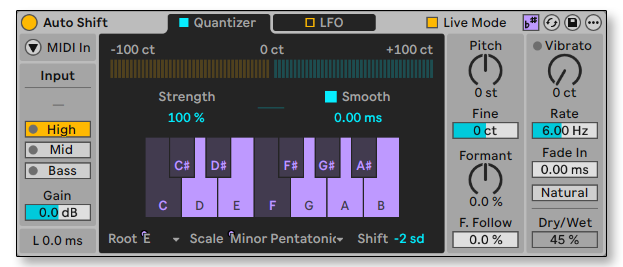
One of the most musical ways to enrich lead sounds and vocals is pentatonic harmonization. Essentially, you blend your lead with a second layer pitched two pentatonic scale degrees below the original.
An easy way to achieve this is to use the Auto-Shift. We can first manually set the key to the Pentatonic key of our track, so if our song is in C Major set the Auto-Shift to C Major Pentatonic and if it’s in minor set it to Minor Pentatonic.
Then we turn down Shift by 2sd.
Put the Auto-Shift in Live Mode to reduce latency, Smooth all the way down to 0ms and input should usually be set to High but see which range is being highlighted the most with LED indicators when playing and choose that.
Lastly to control the effect with our Mod Wheel simply map it using MIDI mapping mode or the Expression Control to the dry/wet of the Auto-Shift (something like 0%-45%).
Bonus Tip: the Auto-Shift has a built-in Vibrato LFO and that can also be mapped to layer the Vibrato effect with Pentatonic Harmonizing.
Pentatonic Harmonization - Layering
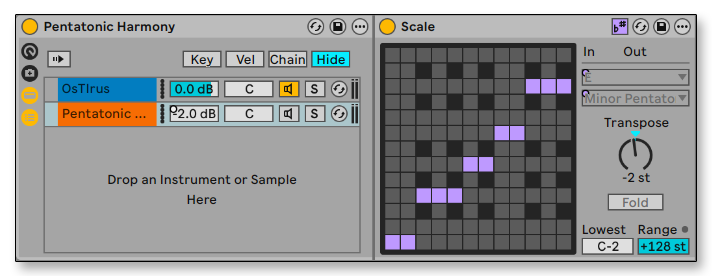
One of the issues with using the Auto-Shift that if we start playing too low on the keyboard the Auto-Shift might start sounding weird and out of tune.
Another way to create Pentatonic Harmonization is to layer the lead sound in an Instrument Rack with the same lead sound but with an added Scale MIDI effect in-key mode tranposed 2st (it’s actually 2sd) down.
Then we’ll map the Mod Wheel to control the Chain Volume. Since it’s a layer the maximum Chain Volume should be about 80% or 2-3dB lower than then main lead sound layer.
Freeze Reverb

Another approach with Mod-Wheel is Sustain Freezing. This can be done with Reverb and Hybrid Reverb. Both have Freeze modes. Simply layer the Reverb in a seprate chain inside an Audio Effect Rack. Turn on both Freeze and Freeze-in and load a Utility before the Reverb.
Map the Utility gain to the Mod Wheel (0%–50%) to control the signal sent into the Freeze Reverb. This lets you build sustained textures while you improvise.
To turn off the frozen textures, map a separate button to toggle the Freeze on and off.
GATE TRIGGERING
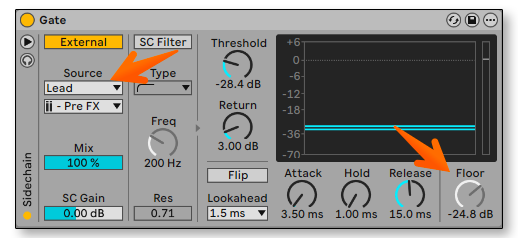
Another technique is to control the volume of the entire playback track. We can do this by loading a Gate on the entire playback group and set it up to listen to an external signal that is our lead sound.
The Mod Wheel should be mapped to the Gate’s Floor Parameter.
Note that if your lead sound have reverb and delay you will get cleaner gate control by layering a dry sound with fast attack and release, muting it, and using that as the Gate trigger.
Octaver

Layering your lead sound one or two octaves lower adds thickness and can accent certain phrases. You can use the same approach as pentatonic harmonization: duplicate the synth, transpose it an octave lower, and control the Chain Volume with the Mod Wheel.
There are more than a few Effects that will let us do close to real-time octaver FXs.
1. Grain Delay
2. Shifter
3. Pitch Hack
4. RNBO Octaver
Synth follower
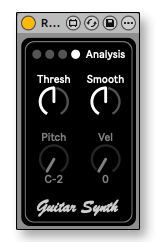
Another guitar pedal from the RNBO pack is the GuitarSynth which has a built-in pitch follower which can add a layer of a synth voice in real time to your lead sound (or even vocals).
Spectral Resonating mp3 artifacts
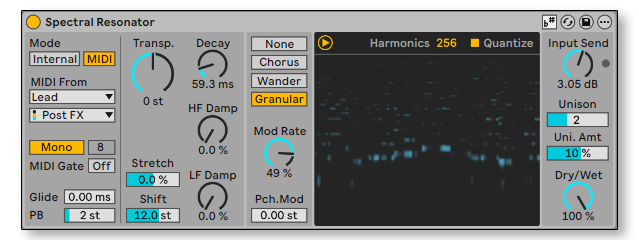
For a sparkly layer, we can use the Spectral Resonator, set it up to receive MIDI from our Lead sound, turn on Quantize, add Unison and change it to Granular mode to get these beautiful higher pitched layer of what sounds like MP3 artifacts.
Controlled Bufferd Glitch

Finally, for a more advanced setup we can use the PitchLoop89 combined with Reverb, Utility and the Shaper in Manual mode to create a glitch effect that we can scan with the Mod Wheel.
Mapping the Shaper in Manual mode can allow us to create custom curves for our Mod Wheel Control.
In this example we use it to turn on the parameter to 100% as soon as we turn up the Mod Wheel.
conclusion
While the Mod Wheel is a classic expression control, combining it with modern tools in Ableton Live opens up many ways to add expression and dynamic control to your playing. Although we covered many techniques in this guide, you can go further by exploring effects like Beat Repeat for stutters, Auto-Filter’s vowel mode, creative delay settings, and more.
If you have any interesting creative uses for the Mod Wheel please share it down below in the comments.
Controllerism Workshop
If you would like to learn a lot more techniques about controllerism check out our 2+ hours workshop HERE
This session will focus on:
-
- How to Controllerism
- Planning a Live Routing
- Playing Melodies with a Fader
- Advanced Clip Launching
- Trigger & Momentary FX
- Dummy Clips & Automations
- Beat Fader
- Custom MIDI Controllers
- INCLUDED: Controllerism Template
- INCLUDED: Controllerism Project from Class
- INCLUDED: Relative Keys Max for Live Device (Exclusive)


